
Here we are in the middle of February and I haven’t posted an update since Thanksgiving? What?!! It’s not that we haven’t been working at the cabin every weekend, it just seems that the holidays, and life in general, sort of got in the way of my blogging! In an effort to catch you up on what’s been happening, I’ll try to be brief and post mostly pictures.
The doors-
Over a year ago, before construction had even begun, we had taken a trip up to Chantilly, VA where we met Don Jensen of Doors by Don, at the Log and Home show. Having seen his advertisements in several Log Home magazines, we’d already decided that we would most likely order our doors from him, so were very happy to find that he had a booth at the L & H show. He with him samples of the different door styles so we were able to check them out first hand and pick out which ones we would use once the cabin was built. By the time we were ready to buy them, however, he had sold the company to Xterior Plus, with the intention of retiring. Lucky for us though, he found retirement a little dull and was back helping out the new owners when Dave made the call to order our doors. Don happily drove the four hours from Wytheville, VA to deliver our doors himself, just as he had promised when we spoke with him way back when in Chantilly.
-

- Don Jensen, himself!
-

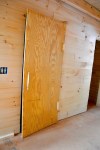
- we have doors!
-

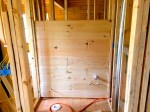
- amazing how different the bedroom feels with the doors up
-

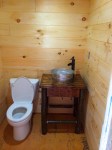
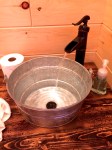
- no more plywood door on the half bath!
-

- love the half doors on the pantry
-

- don’t love the round doorknobs though so wil switch them out later
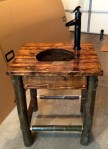
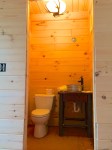
Next on the to do list, the upstairs shower. I do have to say that I love Dave’s idea to run a band of river stone half way up the wall and inside the soap shelf!


After looking at different hardware options, we decided to go with simple wrought iron handles for the kitchen cabinets. Dave and Max also replaced the door knobs on the pantry with handles to match the rest of the kitchen cabinets… definitely looks better!


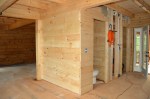
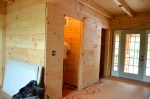
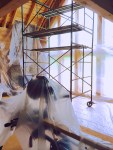
With the doors all hung, Dave and Max work on framing the doorways.
-

- Dave and Max, ready to do some framing
-

- Dave holds the first board, while Max nails it in place with the nail gun
-

- onto the outside of the bathroom door


-

- master bedroom doors all framed in
-

- the linen closet, framed, with door
-

- new towels and extra bedding find a home on the newly built shelves
With most of the lights already up, Dave and Max work on lighting the stairwell. Dave found a cute little deer antler light to use at the base of the stairwell and finally, I have somewhere to hang the Kudu horn light I’ve been holding onto for years!


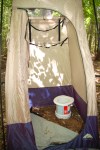
We had been dying to spend our first night at the cabin and finally, by New Year’s eve, the place was far enough along that we could comfortably do so. Megan, Jason, and the boys, had planned to come down to ring in the New Year with us, so we were psyched to have them along as our first overnight guests. We were also joined by Max’s girlfriend, who’s parents were kind enough to allow her to join us!
-

- every house has to have it’s rules
-

- no furniture yet, but our new carpet made the place much cosier
-

- a wide screen tv, bean bag chairs, folding chairs and we were set
-

- first meal cooked in our new kitchen!
-

- Megan and Jason fill their plates
-

- Dave and I in our new matching Colman Cabin sweat shirts 🙂
-

- the kids decide that marshmallow roasting is in order


-

- hey guys, can you spare a marshmallow?
-

- charades any one?
-

- hello, you


-

- we forgot to bring our trusty Cuisinart Grind and Brew coffee pot, but no worries, Jake and Adam to the rescue!
-

- a cast iron skillet, a couple of hammers and voila, a perfect grind
-

- freshly ground coffee, ready to brew in morning
-

- the kids toast the New Year with sparkling cider
-

- Hello 2015!!!
-

- Happy New Year, Richardson clan
-

- the Kings plus one
-

- first morning at the cabin…what a cosy place to wake up in
-

- best cabin jammies ever
-

- good morning, Sunshine
-

- seeping the coffee grinds
-

- a makeshift foil funnel lined with paper towel serves as our coffee filter
-

- Jason chills with a cup of cabin coffe while Sasha takes over Max’s bed
-

- the kids, bright eyed and bushy tailed on New Years day
-

- Last of the Mohicans…still as awesome move the 15th time around
-

- Adam uses the wood burner to sign the guest board
-

- Jake puts his John Hancock down next
-

- signitures of our first overnight guests
With most of the finish work done, Dave puts his energy into building a tv stand and a farm table for the dining area. Our new beds had finally arrived as well so we were all set to spend another night to test them out.


It was another few weeks before we were able to get down for another sleep over…this time, we were joined by cousin Emily. Erin was unable to make it to spend the night, but she and my sister, Julie, joined us the following day. We lucked out with spring like temperatures for the weekend so were able do a cook out and also go for a little walk around the property, which was especially nice as it was Julie’s first time visiting!
-

- cabin games
-

- Jack Skellington Yahtzee
-

- Takaradi Bricks…better known in the US as Jenga
-

- good job Max
-

- Dave, just before felling the tower
-

- Emily and Mituna make a cozy nest with the bean bag chairs
-

- Waffles finds a soft spot out of the way
-

- our lovely view from the great room
-

- sunset over Colemans Lake
-

- snuggly hounds
-

- first breakfast at Dave’s new table
-

- yes, I remembered the coffee pot this time!
-

- Emily and Max watch a little tv after breakfast
-

- Pancake and Mituna take a mid morning siesta on the new bed
-

- Julie and Erin join us
-

- Emily signs our board
-

- Erin is next
-

- followed by Julie…
-

- clearly she’s used a wood burner before!

-

- picnic time
-

- s’mores, of course
-

- the warm weather brings out the puppy in Waffles!
-

- run Waffles, run!
-

- silly ole girl
-

- Mituna watches while Waffles runs wild through the lake
-

- Mituna tries to work up the courage to go in


And last but not least, we drove down this past weekend and delivered our living room couches. The place is really starting to feel like home!


Recent Comments