
By Monday of this week the tongue and groove had been replaced on the second floor. Thankfully, the crew had been able to pull it up and put it back down without damaging the boards!
-

- putting the tongue and groove back down
-
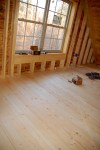
- tongue and groove floor in the kids room
-
- view of the tongue and groove from the 1st floor
Once the floor was put back into place, they moved onto framing the bedrooms and guest bath on the second floor.
-

- Dave and Mr. Lipham in the guest bath
-

- guest bath with the giant window that looks out over the front yard
-

- stairwell leading to the first floor…still no steps!
-

- Mr. Lipham, Raymond and Dave check out the guest room
-

- the inside of one of the bedroom dormers
-

- looking from the kids room to the guest room
-

- the guest room
-

- unfortunately, the front dormer windows are in the upstairs closets…clearly, we didn’t think that one through
-

- looking down into the great room from the loft area
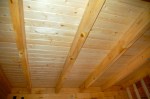
Much of the week was spent working on the five layered roof system. First to go down was the tongue and groove that makes up the ceilings of the second floor and great room, over which was placed the first layer of roofing felt. That was followed by the layer of super thick insulation, followed by a layer of OSB and finally another layer of roofing felt. We’ll eventually have a tin roof placed on top of all of that.
-

- Talon finished the t & g on the ends of the great room roof
-

- Carlos trims out the ends of the roof
-

- Carlos, Nelson, Mateo and Miguel work together on the roof insulation
-

- the edge of the great room roof is trimmed out
-

- scraps of the super thick roof insulation
-

- a network of boards are put down on top of the insulation
-

- insulation in place on the back of the cabin roof
-

- sides of the roof are trimmed out
-

- insulation on the front roof
-

- OSB is placed on top of the insulation layer

-

- the final layer of roof felt is put down
With much of the major building complete, they began to work on smaller details.
-
- Miguel begins to work on the porch and deck post details

-

- Todd Hawkes made these awesome iron pieces to tie together the heavy support beams on the first floor
-
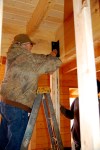
- Mr. Lipham holds one of the corner pieces in place…
-

- then pencils in the screw hole
-

- Raymond drills the holes for the screws….I left before they were finished so haven’t seen them in place 😦
We had heard from a few different sources, one of which was the Perma Chink rep at the Log and Home show, that log sealant should be used on the log ends…Mr. Lipham had never heard of such a thing nor seen anyone else seal their log ends in the 14 years that he’s been building log homes. Pretty sure he thought we were crazy for doing it, but we did it non the less. The log sealant turned out to be the consistency of Elmer’s glue and smelled remarkably like it as well. Actually, it ended up drying somewhat like Elmer’s as well. We’re now pretty well convinced that’s all it is.
-
- The log end sealant…or is it Elmer’s glue?!
-

- Dave rolls the sealant on to the log ends
-

- yep, looks like Elmer’s glue to me
-

- finishing the last row of log ends
-

- Dave hands the roller up to Nelson to roll the few logs he couldn’t reach
-

- still looks like Elmer’s glue to me
Though Dave had stayed down at the work site till dusk several times, I had yet to be down there long enough to see what the sunset would look like from our deck. We had arrived so late the day we went down to seal the logs that I finally had my chance as we were just finishing when the sun began to set.
-

- view of the sunset from the breakfast room
-

- looking out from our bedroom
-

- view from the center of the deck
-

- Dave and Mr. Lipham watching as Nelson seals the last few log ends
-

- old friends at this point
-

- looking out from inside the great room
We are still completely amazed that in just over three weeks we’ve gone from having just a foundation to being almost completely dried in! Although the first estimate was to be done in 16 days, Mr. Lipman’s new goal is to be finished tomorrow which will be 25 days…only 9 day over….stay tuned to see if they meet that goal. 😉

Recent Comments